This is the forth post in our series on how to use your Redman Real Estate Blog. You can read the other posts in the series here:
Blog How To Series
One of the most useful parts of the internet is links: they make it easy to connect different pages of information together, organize areas of a website into sections, and they’re very useful ways to encourage people to take an action.
When you write a blog, it’s a good idea to add links where they make sense. For example, if you’re talking about your opinion of recent market statistics released on the CREB website, instead of replicating the entire report on your blog (that would take a long time!) you can write up only the important parts along with your analysis, then add a link back to the page on the CREB website if your readers want to see the full report.
Even better is to use links to drive people back to your website, especially if you’re encouraging them to take an action such as contact you. For example, if you’ve written up a post about the importance of pricing a home for sale correctly, it’s a great idea to also link to your Home Evaluation Page on your Redman real estate website where they can request your help with one. Not everyone will click on this link, but if your blog post is persuasive you might instantly convert a casual reader into a lead prospect!
If you are a current Redman client and do not have a blog but would like one, or if you want to become a Redman client please contact sales@redmantech.com or call 1.866.425.0022 today.
To get started adding links to your blog posts, follow the steps below.
Step One
Log into your real estate website’s Workstation. On the right side above the calendar there will be a link that will allow you to Access the Blog. Your bar may contain other links as well depending on the products you have purchased. By clicking the Access Blog link, you will automatically be logged into your blog in a new window or tab.

Step Two
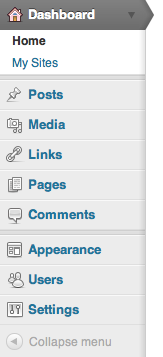
Along the left side of your browser you should see a sidebar that houses the navigation for the backend of your blog. Below Home and My Sites, you should see the button that says Posts.
This Posts button when clicked, will bring you to the Posts’ landing page and expand to give you more post related options. From there, click on Add New.
As a precaution, we suggest that if you are unsure about what the additional features do or how they work that you do not change any of their settings or defaults. The probability of the blog being damaged is extremely high if the wrong option is changed.
Step Three
Begin by writing your post. If you’re not sure what each field is or how to write a basic blog post, you can read our Writing a Post How To guide to get you started.

If you want to add a link to a different page or another website, highlight the text you want the reader to click on to get to the new page: this is called Link Text or Anchor Text. Once this text has been highlighted, click the Edit Link button in the WYSIWYG editor: it looks like three pieces of chain linked together.
Step Four

Add the destination URL of your link in the box, making sure the web address you paste includes the full http:// prefix. If this part isn’t at the beginning of your URL, your link won’t work.
Add a title for your link that will be displayed when someone moves their curser over the link. This should be very short – four or five words at most – and describe the page the link points to.
If you want the URL to open in a new browser window or tab and have your blog remain open, click the checkbox next to Open link in a new window/tab. If you don’t click this, the URL will replace your blog in the current window.
If the page you want to link to is another blog post on your own blog, you can click the arrow next to Or link to existing content, which will let you select which other post you want to link to.

Once you’ve finished either copy/pasting in the URL or picking an existing blog post to link to, click the Add Link button at the bottom of this box. The words you highlighted before will now be blue and have an underline, indicating they have now become a link.
If you’ve changed your mind and don’t want to link to anything, click Cancel.
Step Five
If you want to edit the link, highlight the link text and click the Edit Link button again. This will reopen the Insert/Edit Link box so you can modify any or all of the fields.
If you make a mistake and want to remove the link entirely, highlight the link text again, then click the Unlink button, located next to the link button, pictured as a broken chain. This will immediately remove the link.
To learn more about how to use your Redman Blog, check out the Redman Tech Support Site for helpful tips and tutorials.
Want to know why a blog is so important? Read our previous posts on How Blogging Can Boost Your Business and Why Content Matters So Much To Your Real Estate Clients.
Sign-up For FREE Updates